- sale
- new items
- lovely beads
- wedding beads
- beads for teens
- for custom order
- newsletter
- recognition
- testimonials
- birthstones
- zodiac signs
- jewelry guide
SHOP BAG
![]() in your bag 0 items
in your bag 0 items

Introduction. Beadwoven Sculpture Vs. Bead Embroidered Sculpture
Sculptures made with beadweaving or bead embroidery techniques are about the most spectacular example of pushing the limits in beading. While jewelry made with seed beads is highly subjective - it either appeals or it doesn't - I have yet to see anybody, beader or non-beader, remain impassible when viewing beadwork in sculptural form. It's simply amazing, no holds barred. In the next couple issues of the My Lovely Beads newsletter I will try to provide basic knowledge and tips needed to consider, approach, plan and execute a substantial and entirely dimensional bead sculpture, regardless of the subject matter which might be eventually selected for execution. We'll be exploring sculptural work with bead embroidery techniques.
Before getting to the nitty gritty, I'd like to spend a few words to discuss sculptural work with beadweaving techniques. Between beadwoven sculptural work and bead embroidered sculptural work, beadweaving is probably the more easily approachable of the two. This is mostly because it does not require the somewhat advanced notions involved in planning, engineering, troubleshooting and assembly required to effectively execute a bead embroidered sculptural piece. Any intermediate beader with a good knowledge of possible variations, increasing and decreasing in the stitch of choice already has all of the skills necessary to make a sculpture with beadweaving.

The only other skills required are necessary for both beadwoven and embroidered sculptures and have nothing to do with beads, but with the artist's ability to make their sculpture resemble the original idea. If making an abstract sculpture, the only limits are those imposed by the artist. If on the other hand the idea is to produce a lifelike replica of something, the artist will need to have some basic skills in sculpture and or drawing... a good rule of thumb is that if you can sketch something lifelike from more than one angle without having to trace, then you can produce a lifelike beadwoven sculpture. Those who don't have drawing skills can opt for a stylized bead sculpture, which affords more room for personal artistic expression.
Beadwoven sculptures can be either hollow, or woven over a framework or object. Peyote is probably the easiest stitch with which to approach a beadwoven sculpture for the first time. The simplest "first sculpture" can be made by buying a relatively simple small plastic or stuffed animal toy (such as a lizard, fish, etc.) and covering it with tubular peyote - a great way to become familiar with increasing and decreasing around curves and bends with relatively little trouble before attempting something of your own design. My Hollywood Flamingo sculpture was done in a combination of tubular peyote stitch for the body, neck and head, tubular herringbone for the legs, and fern herringbone for wings and tail. ( Photo 1 )
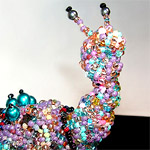
I had to opt for a non-hollow piece, as I needed him to stand up, thus requiring wire and supports for the wire in his legs. He has an air-dry clay head and body, neck and legs are heavy duty aluminum craft wire. Of course I knew I'd have to make a base to help him stand also, so I planned a theater-type setting and constructed the base after having finished the flamingo, adding all of the details (columns, plants, bead embroidered star backdrop, the functional LED light as a spotlight) to the base to transform it into a multimedia bead sculpture. Quicksilver on the other hand is a small freeform hollow bead sculpture which started out as a freeform vessel to use up my bead soup ( Photo 2 ). The vessel took on a life of it's own, and I followed it's lead - Quicksilver is the result. He is an example of a stylized bead sculpture requiring no precedent planning or designing of any sort. He just happened!
Chapter 1. Preliminary Information
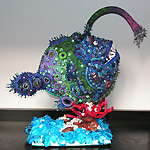
For the entire length of this adventure into the making of a bead embroidered sculpture we'll be using Nemo's Nightmare, my recently completed bead sculpture as a reference, with some photographs of his creation as practical examples. The fish is large, measuring almost 12 inches (30cm) in length and just over 7 inches (18cm) in width. ( Photo 3 )
Brainstorming sessions will accompany you from the moment you begin to scout for a subject for your sculpture all the way to the very last bead you add before calling it a done deal. Some things to keep in mind before approaching a sculpture of this sort:
This type of thing can be classified as a long-term very complex project and should be treated as such. I like to have one of these big projects going "on the side", taking breaks from it once in a while to make a piece of jewelry. You'll find you'll not only want to do it that way, but at a certain point you'll need to take breaks, just to be able to keep your objectivity while working on the sculpture. Disconnecting momentarily to then come back and observe your work with a fresher outlook will keep you from getting bored if you're less focused than I tend to be, and will also help you better approach and solve the inevitable issues you'll encounter along the way
Planning and executing a bead embroidered sculpture will require advanced problem-solving capacities, as well as moments of important decision-making. You will need to be focused while working, and should reserve ample time for beading when you're working on a sculpture. It's not something you can pick up and work on when you have a half-hour of free time. This takes discipline because if you're anything like me, your sculpture will be on your mind 24/7 and the itch to bead in every free moment is strong. Resist temptation, you'll thank yourself! I don't allow myself to work on complex projects when I have less than an hour MINIMUM available for beading - two hours or more are optimal for each session.
For a substantial sized sculpture (the fish is quite large, measurements above) you're going to need LOTS of beads and LOTS of thread. The types and amounts of beads are entirely up to you and you'll decide that on the basis of what your chosen style of embroidery is. I used over 70 grams just in seed beads, not counting accent beads, crystals, pearls, etc. to make my fish. He's done in freeform bead embroidery.
My chosen foundation for bead embroidered sculptures is felt with an iron-on interfacing. To be honest, I considered using Lacy's, but quickly discarded the idea. Lacy's is too stiff, and too thin. You have to keep in mind that you will be joining pieces, creating curves as well as convex and concave surfaces. While this can be easily done with felt, I'd think the results with Lacy's would not be up to par. There is also the weight of your beads to consider - a large piece of bead embroidered foundation can be quite heavy, and since we don't use cardboard to back it, but will rely on the stuffing and an eventual framework/support to hold all the weight, I have serious qualms about Lacy's holding together as felt does, especially over a long period of time.
My last piece of advice, and the most important is this - work ahead of yourself mentally. You'll begin doing this when choosing a subject matter, and will have to continue throughout the making of your project. You'll be taking a 2 dimensional drawing, breaking it down into a serious of flat 2D components, then attaching these components to each other to make a 3 dimensional object occupying space in every direction. Even though you're working on a flat surface, eventually everything you do on that single flat surface will have an effect on the other pieces which will be attached to it. This is especially true when beading near the edges of your components.
You need to remember that all edges will be seams, and any beadwork on one component will need to be carried over to the next component if you don't want people to be able to see where your seams lie. Your flat pieces will become a visual entirety and you want everything about it to be harmonious. Depending on your subject, thus your pattern pieces and the way they fit together, you might be able to attach pieces as you go along, making things easier on yourself. Once you start attaching pieces however, your work will begin to cup and assume a 3D shape, and beading will be more difficult.
You will need to learn to anticipate and solve problems BEFORE they happen, because if and when they do happen it's probably too late, and you won't be able to undo the work you've already done to fix what needs to be fixed without damaging it in some way, or compromising the final outcome to some extent. To get the point across better, let's use an example. You're beading near an edge of your component, and decide to attach a sew-on crystal and highlight it with some concentric circular beadwork around the crystal. You don't have room to make a full circle around it, but get around 3/4 of the diameter, and finish at the edge. Looks cool, right?
Wait... uhm... that's the edge of the component that will be attached to one edge of another component... which you've just finished. You didn't think ahead of yourself, didn't keep in mind and at hand the next component you were planning on working, you can't go on to finish the 3/4 circle on the other side of what will be the seam because you already worked that piece without thinking ahead. The result? When assembled, a seam which physically doesn't show because it's on the inside, but which is just as visible because you have two entire edges of two components with potentially unrelated and definitely non-continuous beadwork. Get the picture? That's one of the many, many, many little things you have to second guess and pick out as you go along. As you begin to assemble your pieces you'll have to fill in the beadwork at the seams, and have that opportunity to try to blend mismatching beadwork, but it won't be as clean and professional as if you'd taken into account adjoining pattern components while beading. Planning is everything.

Chapter 2. Choose your Subject - Brainstorming Mode
Now that you've digested all of the above information, if you feel butterflies in your stomach and are already surfing like a nutcase for the perfect subject while elaborating color palettes at the same time, you're not only ready to undertake this, you're hooked before even starting. Those who love challenges and get bored with projects that don't make them sweat will find nothing less than beading nirvana in the making of a bead embroidered sculpture.
Before you choose a subject you need to keep in mind the following:
For every subject you seriously consider for execution, you will have to analyze every aspect involved in transforming it into a 3 dimensional object using textiles (thus not self-supporting) and beadwork before being able to decide whether you have the necessary skills to make it or not. The skills involved are not so much the embroidery in itself, even beginning beaders can handle bead embroidery. What you must be absolutely sure of is your ability to break that subject up into parts (create a pattern, exactly as the dressmakers/stylists do) that reassembled will resemble exactly what you want it to resemble in 3D form, that is nowhere near as easy as you might think.
My fish subject was easy - most fish, and in particular the one I chose as a subject (deep-sea angler fish) are largely 2 dimensional, composed of two more or less flat sides, with dimension more visible in the head/mouth/chin area in front of the fish. When preparing for the project and drawing the various components of my fish, I didn't even draw out the extra pieces I inserted at the front of the head area to define the "front", I did that when the fish was completely embroidered and ready to be assembled. ( Photo 4 )
After I finished this fish, I was immediately possessed by the not so practical inspiration to make an octopus. I spent no less than 56 hours and a whole pad of paper sketching and cutting out pieces which, when assembled, were supposed to look like a realistic octopus. I finally got it, but still have no idea how... even with my background in textiles and fine arts. I came to the conclusion that the pattern making process has major elements of geometry and engineering involved, and mathematics and I are not the best of friends. The bottom line is that the less complicated your subject matter is, the least amount of planes and protuberances it has, the easier it will be to design and execute. Wish me luck on the octopus.

When choosing your subject, take into account the necessity or lack thereof of having to make some kind of base or stand for it. I had to do that for the fish, I'm not making a stand for the octopus. If you decide you'll have to make a base or stand, then you also have to include that in your brainstorming for feasibility.
Can you easily make and attach a base? How and where will it be attached to your subject? How will it be anchored on the inside of your project? Will you have to plan something to hide the entry point of your support on the outside somehow (I made coral to do that on my fish stand... it hides the point of entry of the aluminum tube supporting the fish)? ( Photo 5 ) Do you think you'll need some sort of framework on the inside to support the weight of your sculpture (you most likely will, unless your sculpture is fairly small)? Will you need a stuffing material also? Do you think you'll use something more fluffy like polyfill, or something more substantial which will also help support your beadwork? Take into account mouth and teeth if you're making an animal with an open mouth. If the mouth is open, you'll have to come up with a solution for the inside of the mouth so the stuffing won't be visible, as well as the teeth.
Are you capable of mentally visualizing a 2D image from every angle as if it were 3D? I can, but not everybody has that ability. If you're not capable, can you find enough images of the various angles of your subject to be able to reproduce it from pictures? If so, download and print all of them, you'll use pics and sketches to make a mini-design dossier of a few pages which you'll need to keep nearby for reference when working, makes things much easier.
New Dimensions in Beadwork - An Overview of Bead Sculpture. Part 2
Beadart by Andrea Landau gallery
About author:
| Andrea Landau, Italy | |
| Email address: | andrealandau@tin.it |
| Website: | www.originalsindesigns.net |
| Etsy Shop: | originalsindesigns.etsy.com |
![]() Copyright © 2013 by MyLovelyBeads.com. All rights reserved. Website design by Asea Ginsburg
Copyright © 2013 by MyLovelyBeads.com. All rights reserved. Website design by Asea Ginsburg