- sale
- new items
- lovely beads
- wedding beads
- beads for teens
- for custom order
- newsletter
- recognition
- testimonials
- birthstones
- zodiac signs
- jewelry guide
SHOP BAG
![]() in your bag 0 items
in your bag 0 items

Chapter 3. Preparing your Pattern
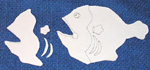
OK, so you have selected your subject, have him sketched out, have supplies and are ready to go. Nope! Almost, but not yet. Trace your sketch on tracing paper, including all of the details, cut it out and attach to poster board. This is your main template. Below are my initial sketches of my fish, to the left my main template. ( Photo 6 )
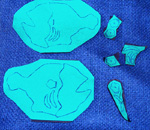
Take a good look at your sketch. We are taking this 3D, so why not extreme 3D? Real-life 3D? Let's do it! I'll show you what I did for that in regard to my fish, you'll have to evaluate your subject to see what you can do where to make the whole thing more interesting. ( Photo 7 )

As you can see, I broke my sketch down into pieces, and attached the pieces to poster board for template purposes. The fin is self-explanatory, it was constructed and later attached, and sticks out like a fin is supposed to. The curved pieces are gills, and I also decided to add emphasis to the head area so I made a separate head template. ( Photo 8 ) I wanted to raise the gills above the rest of the beadwork, so I made them separately. I decided I wanted to stuff the head part even though the entire fish was destined to be stuffed, to add more interest and dimension to the sculpture.
The bottom curve of the head next to the gills was treated (and decorated differently from the rest of the head - with bugle beads) as another gill, and sits above the rest of the beadwork while the rest of the head is tacked down. I'll show you my solution for the gills further on. As you can see, you can easily find elements even in a simple subject that you can play with according to your creativity to add emphasis to a specific area, or simply to add more interest to the whole. Once you've singled out which parts you want to treat differently, take another piece of tracing paper and trace them directly from the template. Cut them out and attach them to cardboard. Now you're ready to trace your various pattern pieces onto your felt, and only a breath away from picking up those dang beads, because I know you're busting a gut by now!
Chapter 4. Doing It!
Which piece you start working on might or might not depend on your project. In your initial brainstorming and planning for the project, you may have come across a design issue that needs to be worked through first for the rest to flow... or starting from a particular component might make the rest easier, or you might simply want to get the largest component out of the way first. You'll be the best person to judge where to start from. As in traditional bead embroidery, regardless of the piece you do decide to work on first, you'll attach any cabs, rivolis, focal stones and/or bead the focal elements first, then go on to the background.
Always work AWAY from any beadwork already done, top to bottom or side to side is fine, never work bottom to top. You'll have to deal with your thread getting caught constantly, especially when working on a larger beaded surface. For this reason, make sure you go at least TWICE through any crystals, pearls, beads or anything attached with stop-stitch. Your work must be tight. It is no fun to finally breathe a sigh of relief after 400+ hours of work thinking you're done, only to find your crystals, pearls and embellishments are wiggly (horrors!) and you have to go back through them to tack them down tight. My fish has over 300 Swarovski bicones attached, not to mention the rest... tack those babies DOWN!!
Keep your rows of beads fairly tight up against one another, more so than you would for making a piece of jewelry, especially if your subject is very "puffy". If you curve a piece of beaded foundation, you'll see that the rows "open" slightly. If you have too much distance between your rows when you stuff your sculpture, you'll see a lot of foundation underneath which you don't want to be showing. For this same reason match your foundation and your thread as closely as possible to the main color of beads you intend to be using.
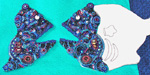
If you're looking for a symmetrical effect in your embroidery, you can match beadwork on two or more components. I did this for my fish - on both sides of him the beadwork matches, not perfectly because perfectly is next to impossible, but almost perfectly. You can see this in the photo of the head of the fish, both sides finished. ( Photo 9 ) To achieve this you need to be very careful in positioning your focal points on all of your "matching" components as symmetrically as possible, they should be in the same position on all pieces. From those, your beadwork flows, so if you do this well you'll have few problems doing the exact same beadwork on each component of your sculpture. The second thing you need to do to ensure a good outcome is to work on all of those components at the same time. Do a couple of inches of beadwork on one piece, then put it down and repeat on the next, and so on.
As stated earlier, if you have designated areas to which you wish to add extra dimension, you can do that with fairly simple solutions. I came up with two. The first is to pad or stuff the piece when you attach it to the main body of the sculpture. To attach the head piece of my fish, I tacked it completely down to the body along the external (mouth side) perimeter. I then stuffed it from the body side, tacked down along the top curve, and treated the area with the bugles differently, as it is considered one of the three sets of gills and received the same treatment. The gills and the head part which I didn't tack down were raised with large beads to sit above the rest of the beadwork. You can see this clearly in the photograph ( Photo 10 ). I invite you to get creative with your sculpture. Since a project like this takes amazing amounts of time, love and patience, the bit of extra time you take to really pay attention to and work with detail will come back to you 100 times over in the end result!
Chapter 5. Assembly
So you've beaded your tootsies to the bone, have gone back to examine all of your finished components for any loose embellishments, empty areas, etc. and have decided it's time to put it all together. Nope. If you need a stand or base for your project, now is the time to make it, BEFORE assembling. You'll have to leave a gap somewhere to insert base and stuffing, and until you have the base made you can't be 100% sure exactly how and where it will be attached... you can take a good guess... but by now you've found out that guessing games are too dangerous to risk. You want to leave as small as possible a gap for stuffing and inserting the base because when you've done that, you'll have to close the beadowork around the base/stand, and finish up the beadwork on top of that last seam... not a simple thing when you have a big, somewhat soft and heavily beaded and embellished sculpture with a base attached to flip over, upside down and side to side to be able to effectively finish the beading nicely. The less gap, the less seam, the less pain in the patootie! Make your base/stand now!

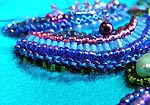
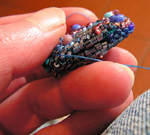
Once that's out of the way, you can begin assembling your sculpture... and believe me, at each stitch you will become more and more amazed that you actually produced such a wondrous piece of art yourself. Food for the soul... and the ego too! Felt doesn't fray or unravel, and the best stitch to use when assembling is whip stitch. Once you've assembled all of your components leaving a gap to be able to stuff the sculpture and insert the eventual base/stand, go back and bead all of the empty areas around the seams, blending the beadwork from one component to the other to give a continuous and harmonious visual effect to your beadwork. Nobody who looks at the sculpture should be able to guess where your seams are if the beadwork has been done with attention. Below is a picture of one of the fins of my fish. ( Photo 11 )
It is composed of two components which were sewn together. What you see is the beadwork which I did along the seam. ( Photo 12 ) Since the fin is flat, thus with a front and back, there was no need to "blend" the beadwork on each side along the seams - the two sides of the fins actually have two separate embroidery motifs, and the side you see in the first photo is the "backside" of the fin, close to the body. The front of my fish which is the part with the most dimension - in the head area - has three separate components sewn together, but the beadwork flows from one side to the next as if I'd beaded the fish as a whole, and not in unattached sections.
To those highly adventurous fanatics who are seriously considering approaching a bead sculpture of this importance... You now have a wealth of basic information, and are officially on your own! I wrote this sculpture overview series to provide beaders with some general and not so general background on how I go about making a bead sculpture of this type. It's no doubt one of many ways, and though a number of elements will be common to all techniques, I'm sure that different artists go about this each in their own manner.
Though I've surfed beading sites for years and hours on end, I've only come across very superficial information regarding the actual making of a bead sculpture, and every single thing I've written in this series in regard has been solely on the basis of my own experience, not being able to access specific background information myself to be able to develop this type of bead sculpture from. Translated, that reads be brave and experiment. Few things in the process are carved in stone, and those few things are easily recognizable. Treasure those, and ad lib the rest. You might find easier/better ways to do something than myself. Or you might not. You'll never know until you try, so push your limits - surprise yourself with a work of art that when done is a source of personal fulfillment and beauty that will leave everybody, and above all yourself... simply amazed!
New Dimensions in Beadwork - An Overview of Bead Sculpture. Part 1
Beadart by Andrea Landau gallery
About author:
| Andrea Landau, Italy | |
| Email address: | andrealandau@tin.it |
| Website: | www.originalsindesigns.net |
| Etsy Shop: | originalsindesigns.etsy.com |
![]() Copyright © 2013 by MyLovelyBeads.com. All rights reserved. Website design by Asea Ginsburg
Copyright © 2013 by MyLovelyBeads.com. All rights reserved. Website design by Asea Ginsburg